Board Export+ Power-Up Guide
Board Export+ helps Trello users export board or card data into reusable files and scheduled deliveries. This guide explains the Power-Up screens, settings, and common workflows.
Quick Export Workflow
- Open Board Export+ from a Trello board or card.
- Use Start to confirm scope, file name, format, and export readiness.
- Use Fields to choose columns and their order.
- Use People and Labels when member or label data should be included or filtered.
- Use Presets to apply a saved or starter configuration.
- Use Preview to inspect the output shape.
- Click the main export button in the footer.
The sticky footer shows the board name, export readiness, selected card/list/field counts, format, and active filters.
Visual Walkthrough
Use these screenshots and the walkthrough GIF to understand the core Board Export+ flow before setting up your own exports.
Quick Video Guide
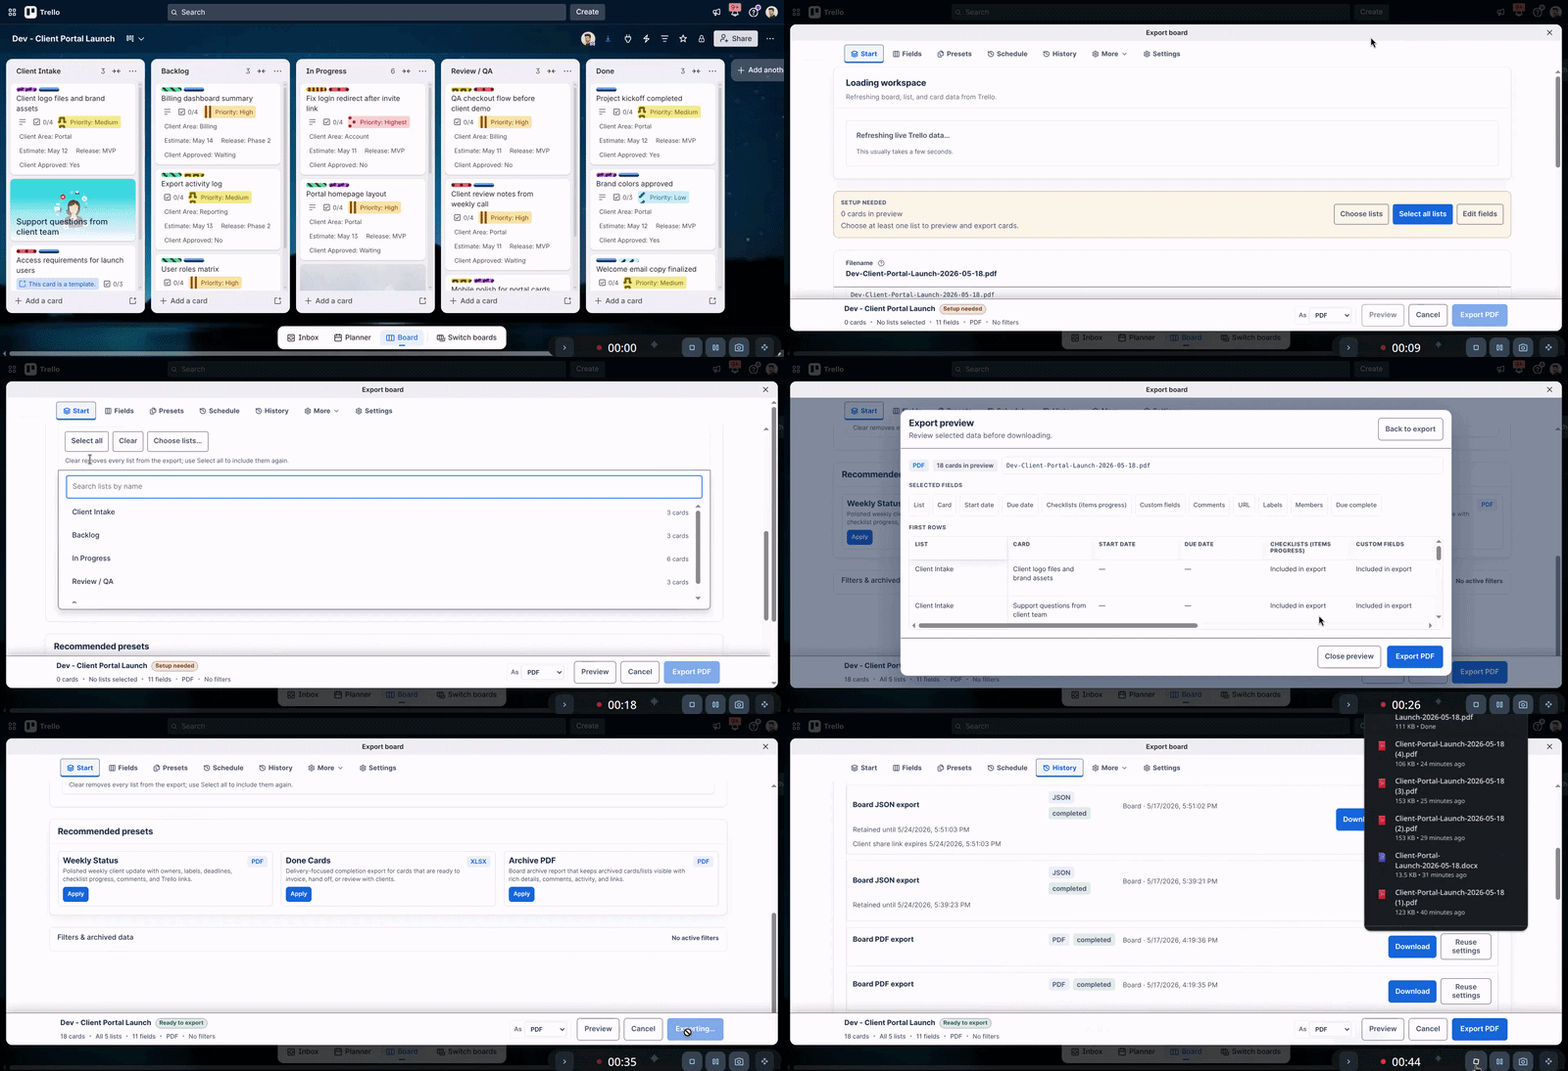
Product Screenshots
Export Setup
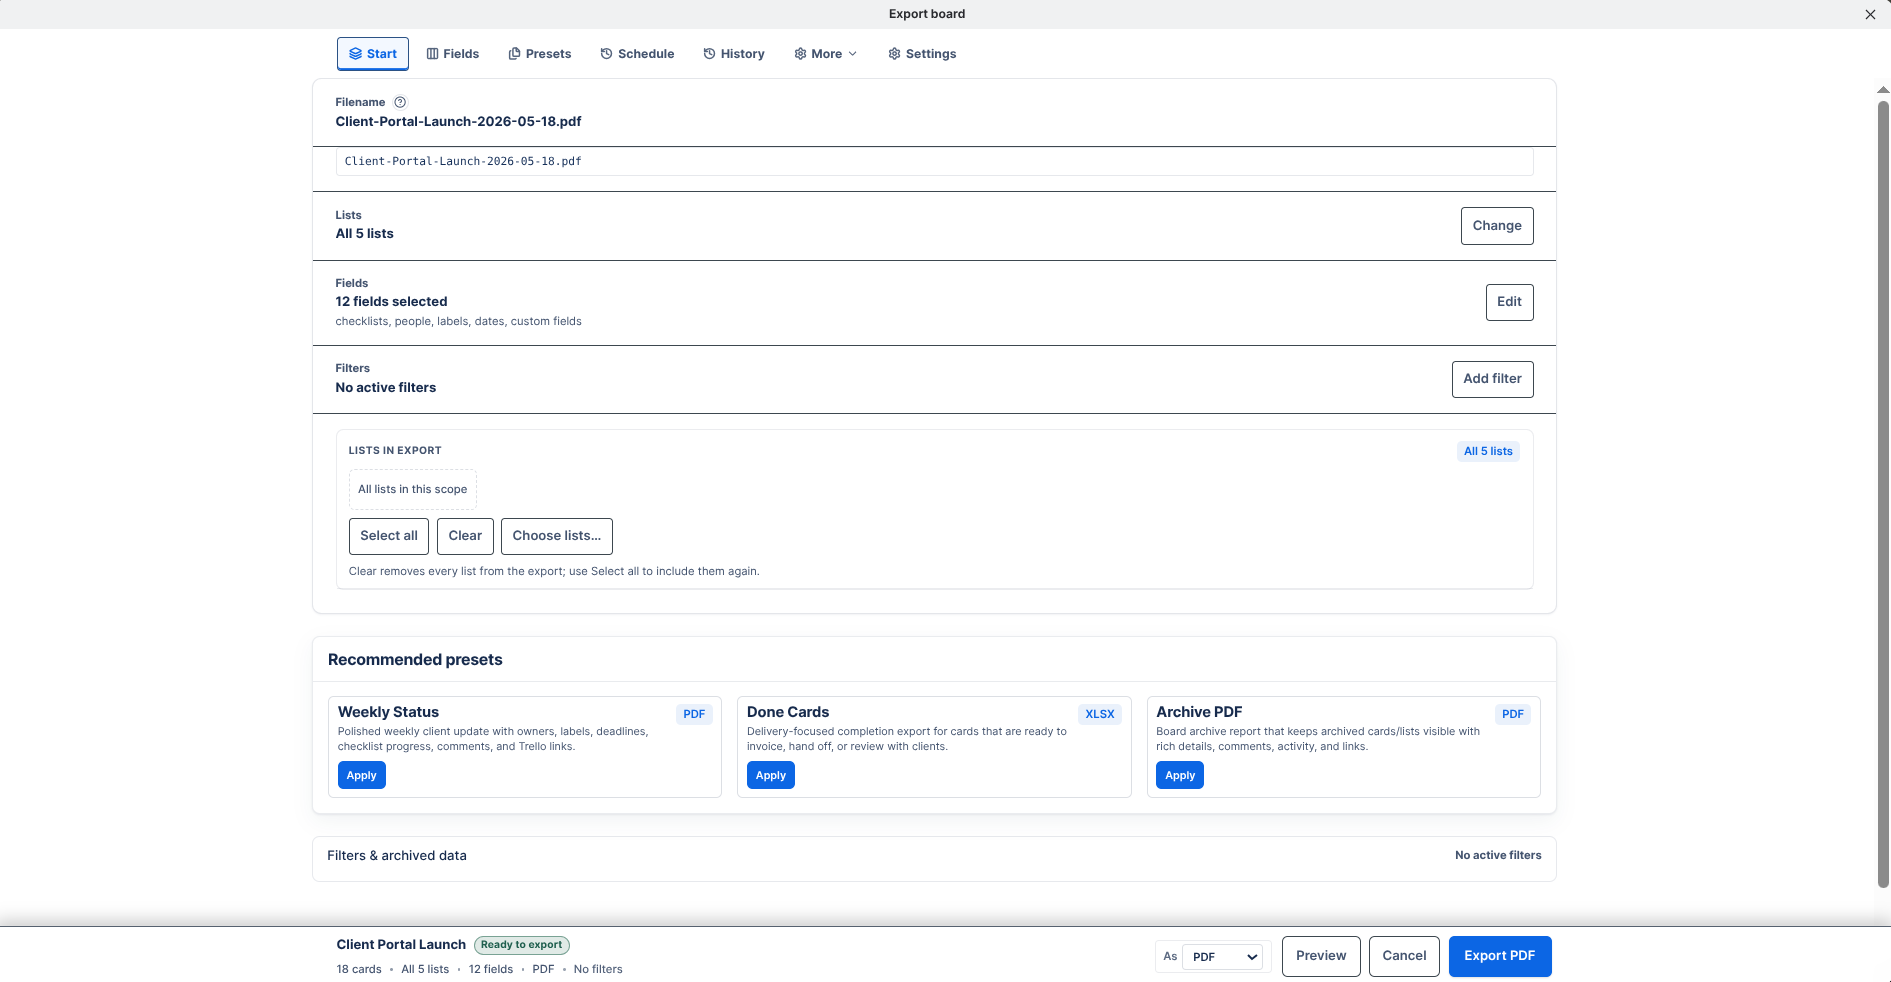
Choose the export scope, format, filters, and confirm readiness before downloading.
Field Selection
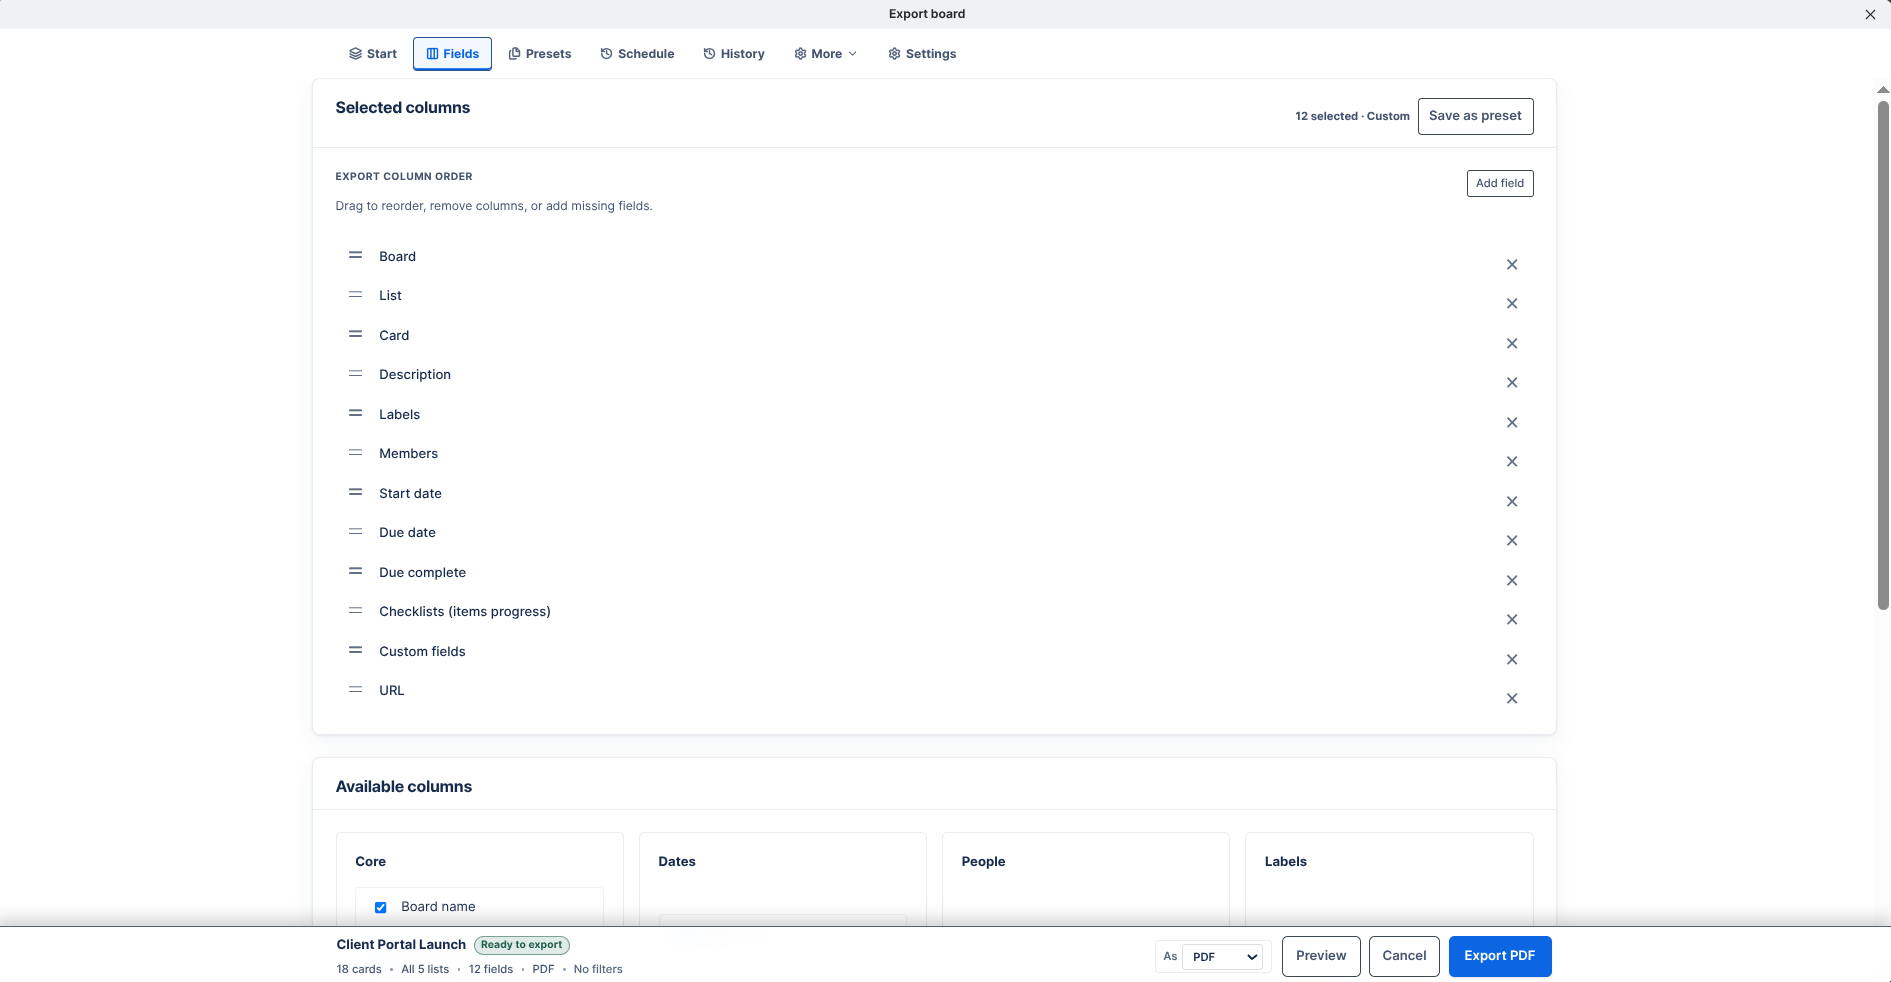
Select exactly which Trello fields appear in the export and control the column order.
Export Preview
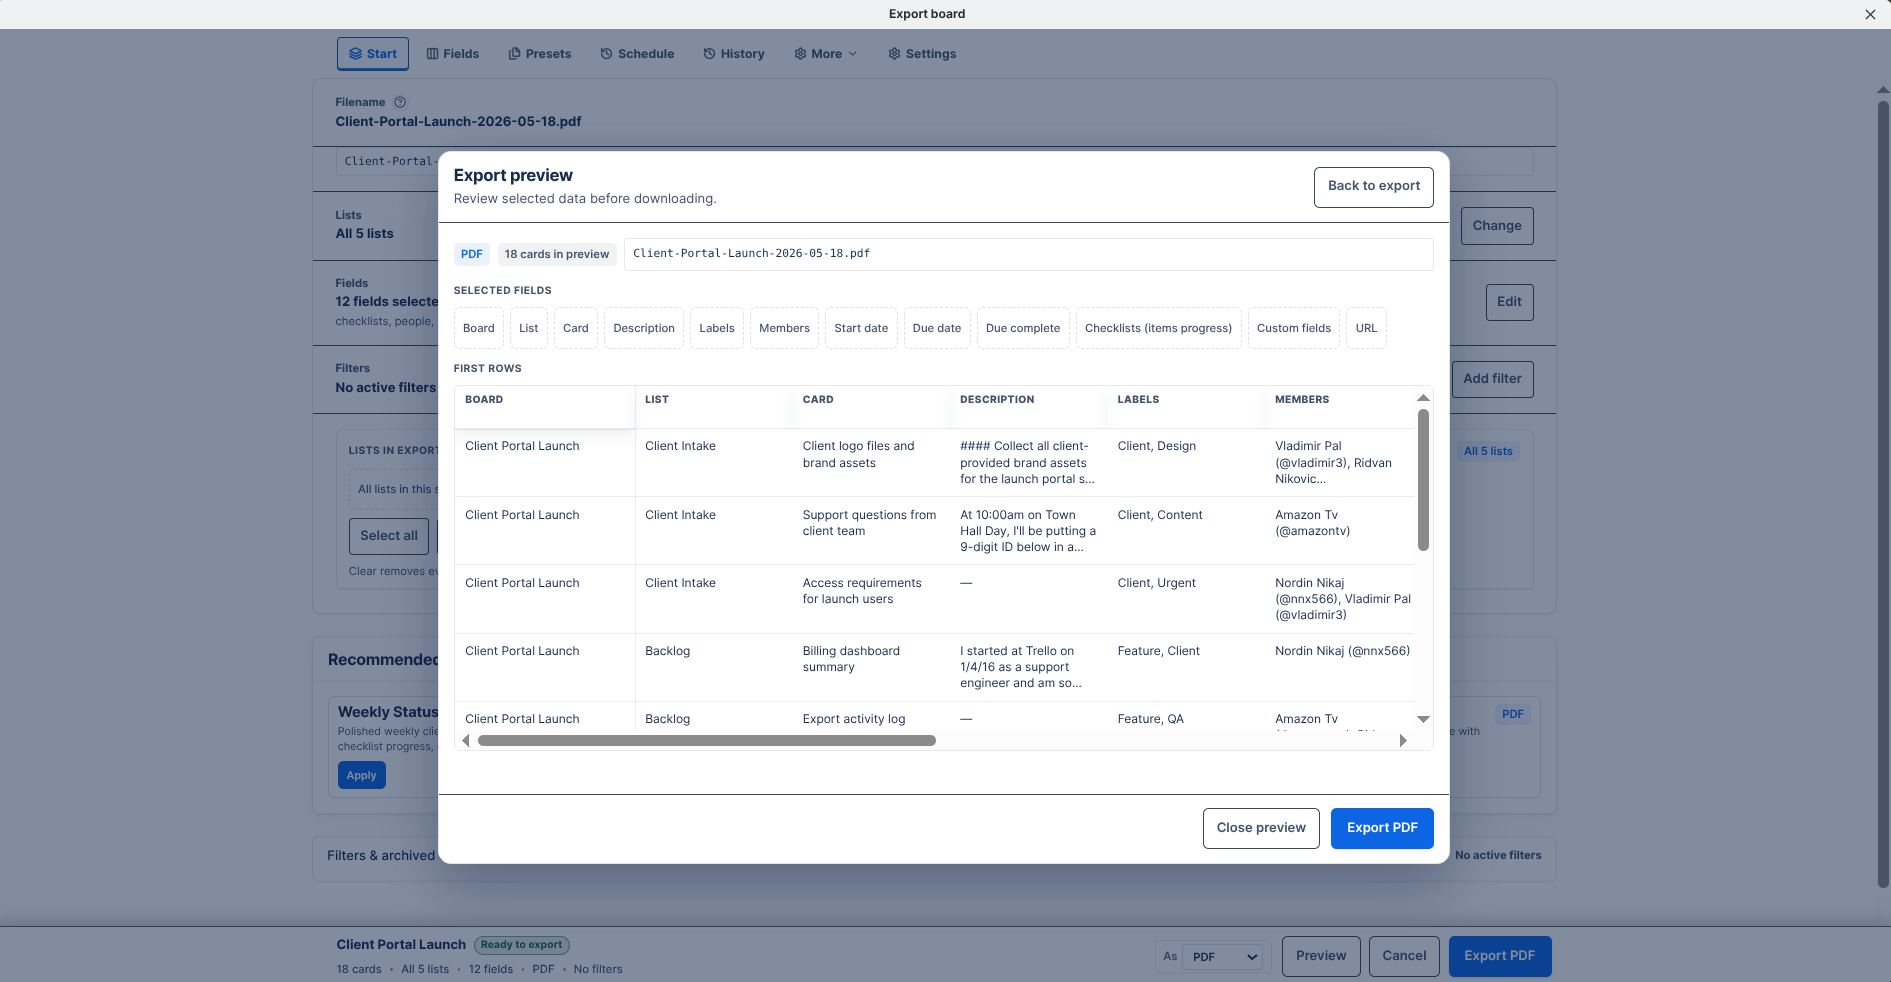
Preview the export before downloading so reports are clean and client-ready.
Scheduled Exports
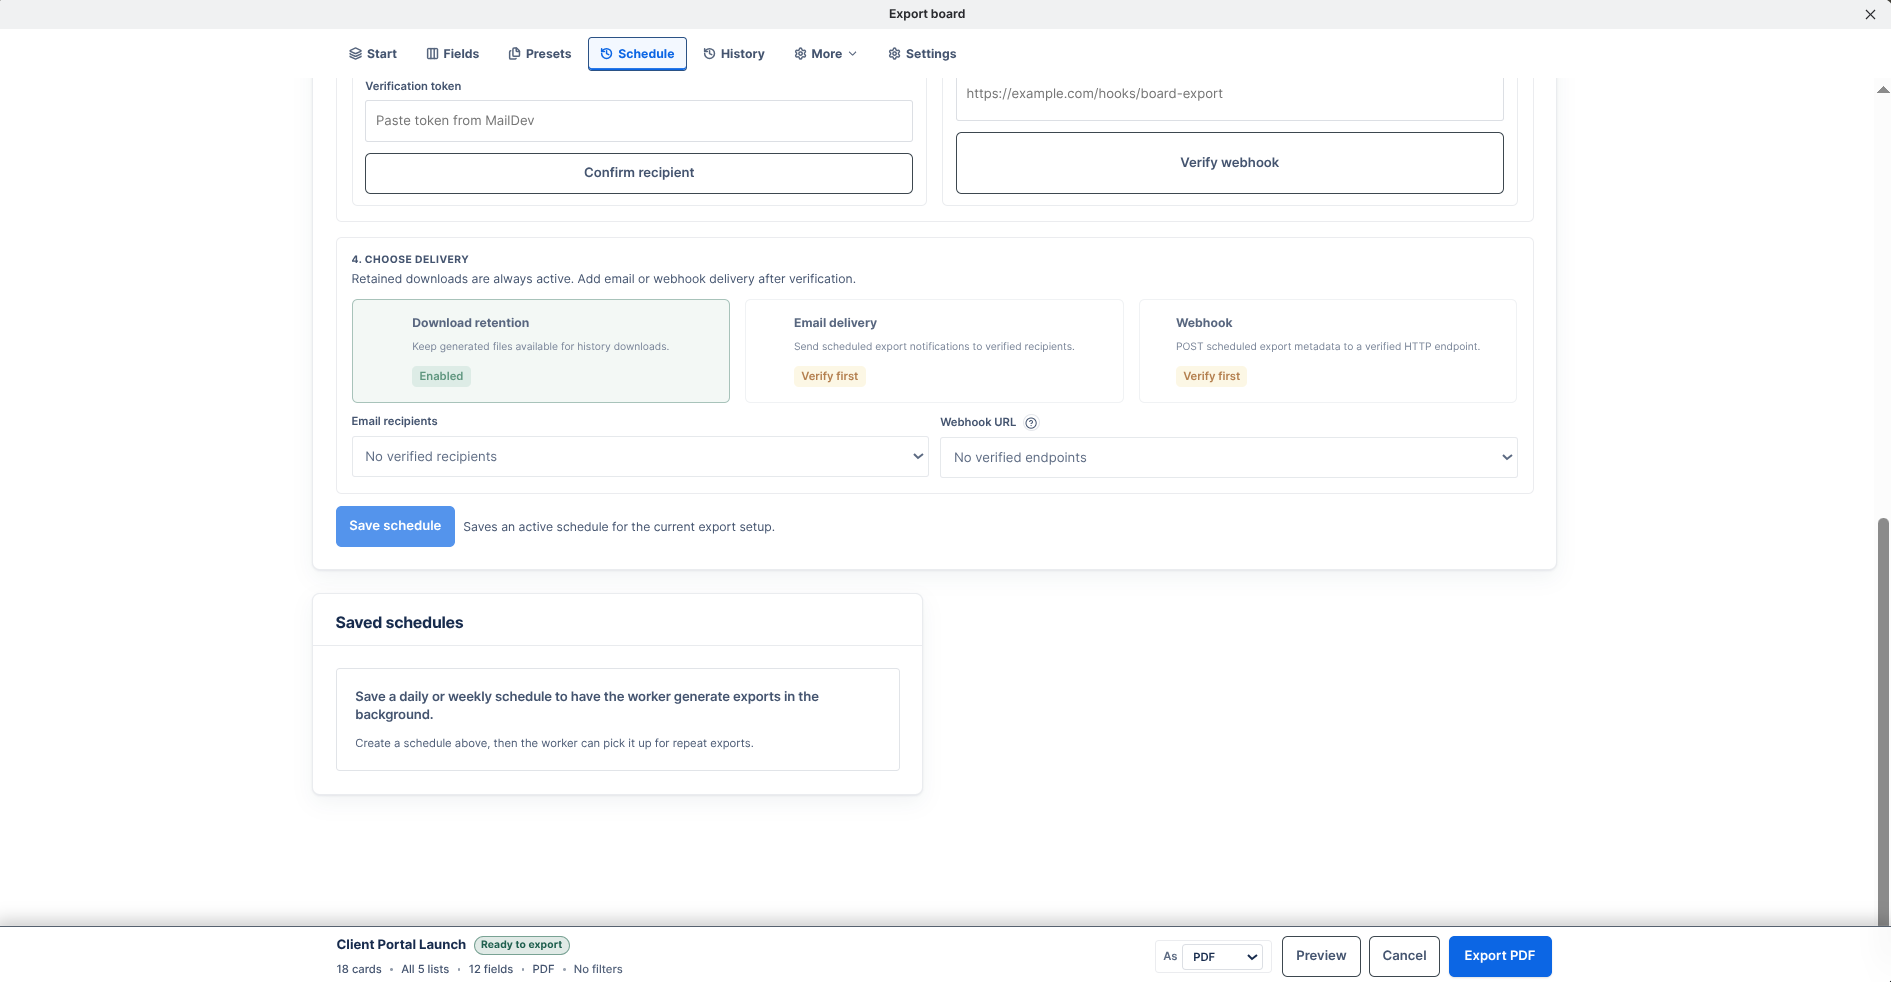
Schedule recurring exports with timezone-aware run times, retained downloads, and delivery options.
Export History
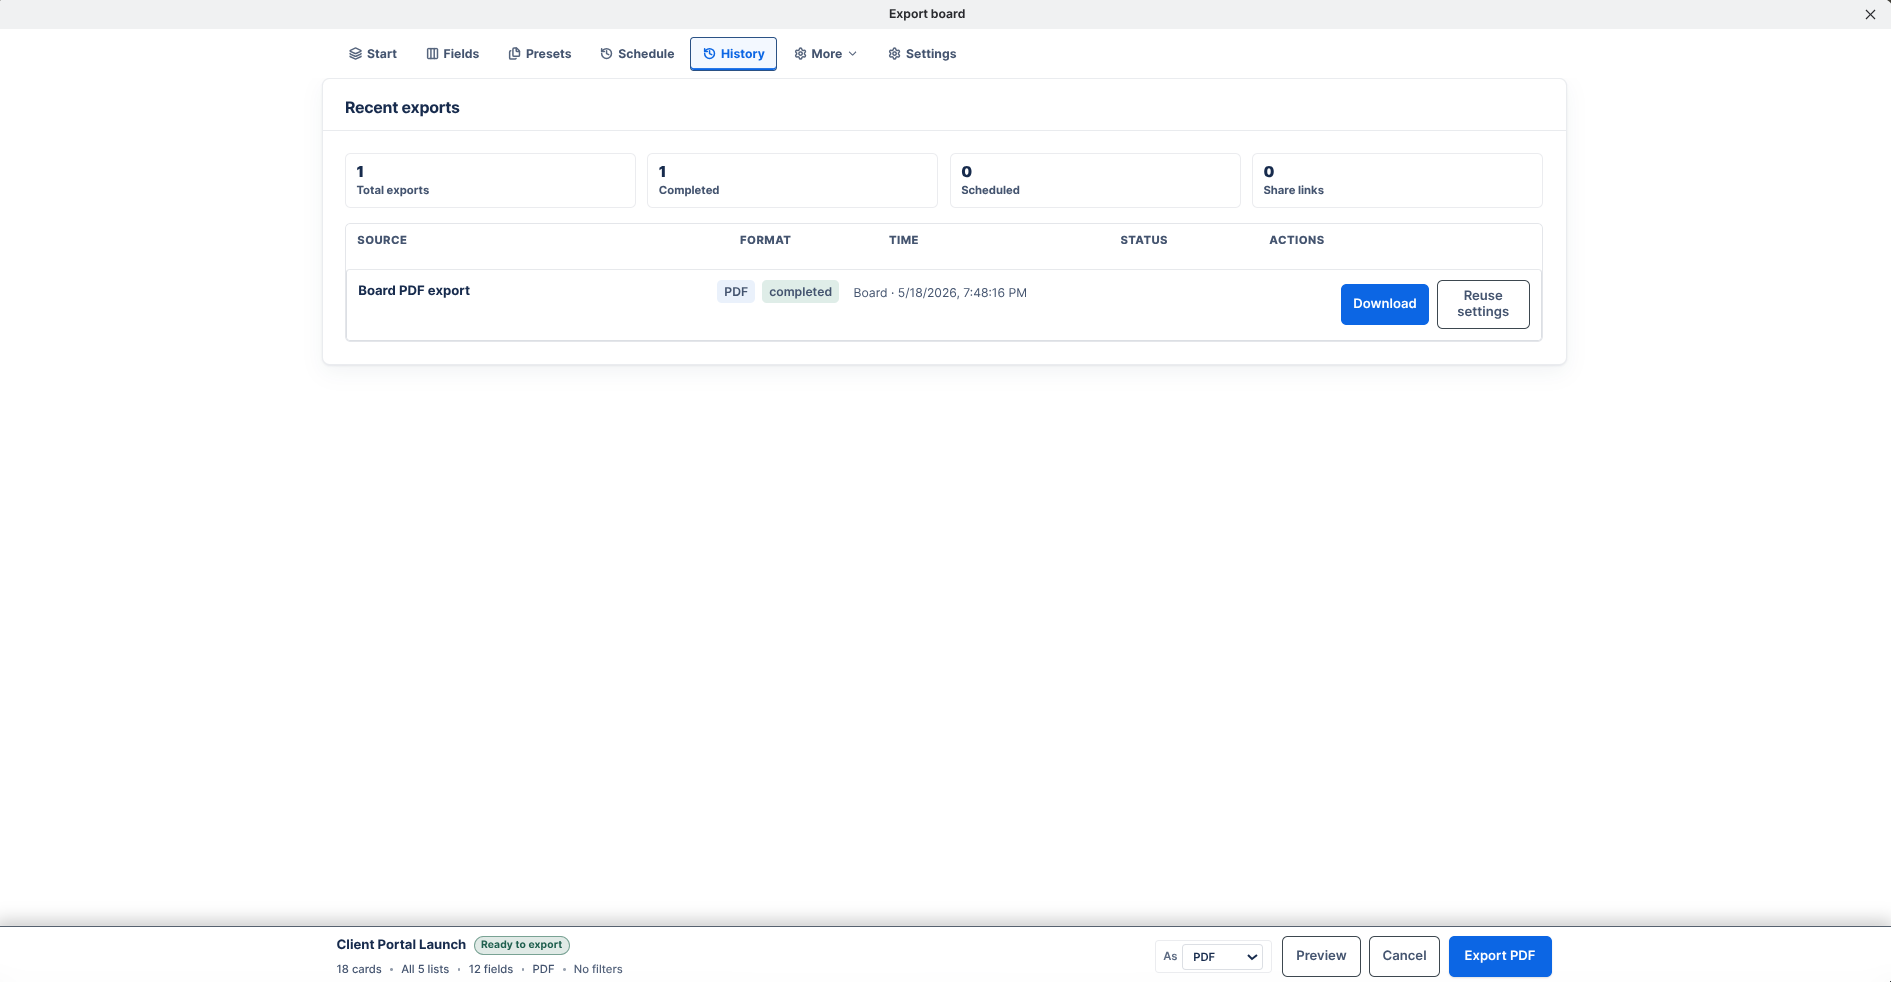
Access recent exports, copy client share links, and reuse previous settings.
Presets
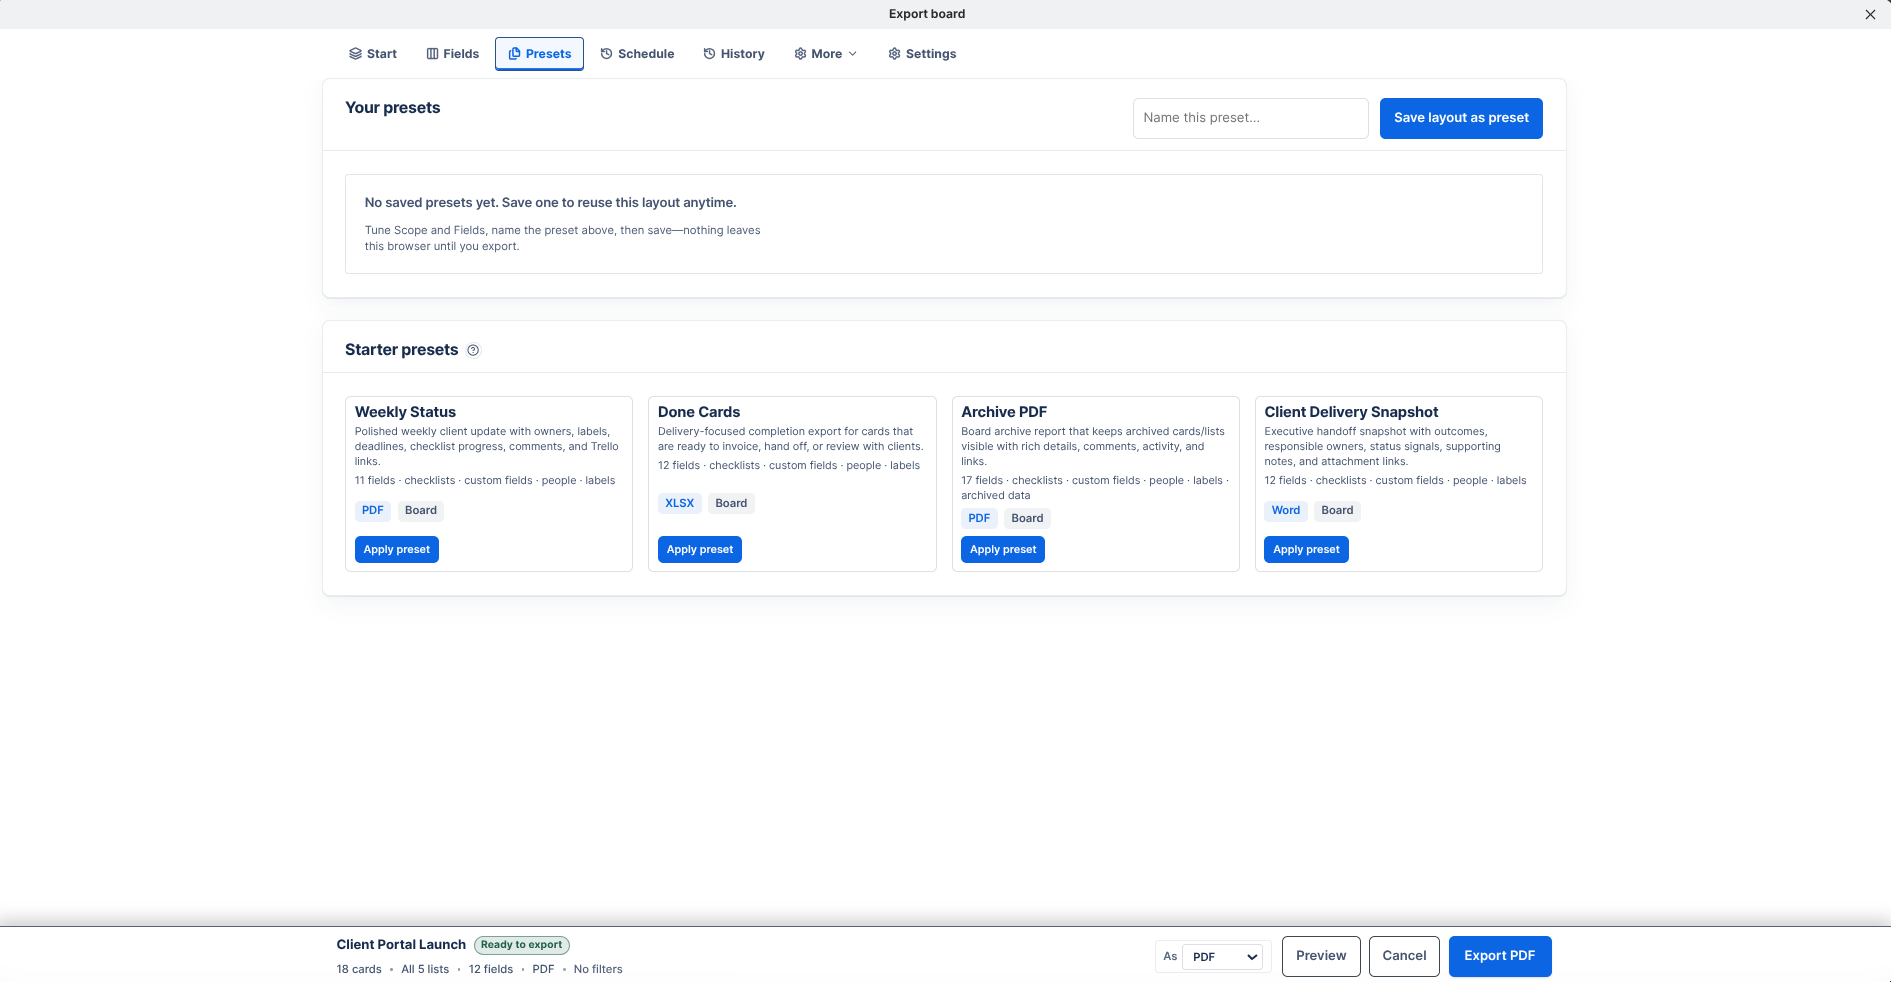
Apply starter presets or reuse saved configurations for consistent reporting.
Start
The Start tab is the main launch point for a one-time export.
- Export check shows whether the current setup is ready, needs review, or is blocked.
- Filename shows the generated file name before export.
- Scope and filters control which cards are included.
- Format controls the file type, such as CSV, XLSX, JSON, PDF, PNG, DOCX, or ZIP.
If export is blocked, follow the setup message first. Common blockers are no selected cards or no selected tabular columns for formats that require fields.
Fields
The Fields tab controls tabular columns and field order.
- Enable fields such as board, list, card, description, labels, members, dates, custom fields, URLs, comments, activity, and attachments.
- Reorder fields to control column order in CSV/XLSX/JSON-style exports.
- Some fields depend on related options. For example, label output depends on label options, and member output depends on people options.
Use a smaller field set for client-ready exports and a broader field set for audits or backups.
People
The People tab controls member data.
- People columns selects which people-related fields are included in the export.
- Included people shows people currently in scope.
- Removing a person from scope filters matching cards from the export run.
Blue “Included” states mean the option is selected for the export. Green is reserved for successful or verified states elsewhere.
Labels
The Labels tab controls label data.
- Label output options controls whether label names, colors, and grouping flags are included.
- Labels in scope shows labels currently available for this run.
- Removing a label from scope filters matching cards from the export run.
Use label filtering when you only want to export cards tied to a client, status, department, or workflow label.
Presets
The Presets tab provides reusable export setups.
- Starter presets apply common layouts for board snapshots, client reports, and detailed card exports.
- Saved templates can be reused to keep team exports consistent.
- Duplicating a preset is useful when you want a variant without changing the original setup.
Always review Start and Fields after applying a preset, especially when switching formats.
Schedule
The Schedule tab creates recurring exports using the current export setup.
Key schedule settings:
- Name identifies the schedule in the history and management views.
- Cadence controls daily or weekly recurrence.
- Time and time zone control when the schedule should run.
- Delivery targets verify email recipients and webhook endpoints.
- Delivery methods choose retained downloads, email delivery, webhook delivery, and public share options when available.
If a scheduled export does not arrive, confirm that the schedule is active, the time zone is correct, and at least one verified delivery target is selected.
Email Delivery
Email delivery sends scheduled export notifications to verified recipients. It is intended for team members, clients, or other recipients who need to know when an export is ready.
Requirements:
- The recipient email address is verified from the Schedule tab.
- The schedule is active and includes Email as a delivery method.
- Download retention or public share links are enabled when recipients need a download URL in the notification.
User workflow:
- Add an email recipient in the Schedule tab.
- Open the verification email.
- Paste the token into the verification field.
- Select the verified recipient for delivery.
- Save the schedule.
Recipients receive an export-ready notification with schedule details, file metadata, and a download/share link when the schedule is configured to retain or share the generated file.
Webhook Delivery
Webhook delivery posts export metadata to a verified endpoint owned by your team, client, automation platform, or integration service. It is designed for production systems that want to react when a scheduled export finishes.
Before a webhook can receive scheduled export notifications, it must be verified from the Schedule tab. Use a webhook URL from the system, automation tool, or integration service that should receive the export notification.
Verification workflow:
- Paste the receiver URL into Verify webhook in the Schedule tab.
- Board Export+ sends a challenge request to the receiver.
- The receiver echoes the challenge token.
- After verification, select the endpoint under Webhook URL.
- Enable Webhook delivery and save the schedule.
If verification fails, confirm that the webhook URL is correct and that the receiving service is ready to accept Board Export+ verification requests.
History
The History tab shows recent export jobs when history saving is enabled.
- Completed jobs can be downloaded while retained artifacts are available.
- Failed jobs show status so you can adjust settings and rerun.
- History availability depends on your saved settings and how long generated exports remain available.
More And Advanced Settings
The More menu contains lower-frequency sections such as Schedule, History, Advanced, and Help & docs.
Advanced settings include optional export behavior, branding defaults, and other controls that affect the current export without changing Trello itself.
Power-Up Settings
Power-Up settings manage long-lived preferences.
- Account & connection reconnects or disconnects Trello REST access.
- Defaults control preferred format, filename pattern, and remembered setup behavior.
- Dates & time zone controls how dates are interpreted and displayed.
- History controls whether export history is saved and how long it remains visible.
- Reset preferences clears saved preferences, branding, defaults, and remembered layouts.
Use settings when you want to change defaults for future exports. Use the export tabs when you want to change only the current run.
Export Formats
- CSV/XLSX are best for spreadsheet workflows.
- JSON is best for integration, automation, or backup-style output.
- PDF/PNG/DOCX are best for presentation-style reports.
- ZIP is best when exporting Trello attachment files and a manifest.
Not every option affects every format. For example, presentation branding matters most for report formats, while field order matters most for tabular formats.
Troubleshooting
Export Is Blocked
Check the Start tab export readiness message. Most blockers require selecting cards/lists or adding fields.
Schedule Did Not Run
Confirm:
- The schedule is active.
- The selected time and time zone are correct.
- At least one delivery method is enabled.
- The selected email recipient or webhook endpoint is verified.
Webhook Verified But No Delivery Appears
Confirm that Webhook delivery is enabled for the schedule and that the verified webhook endpoint is selected.
Email Verification Does Not Arrive
Check the recipient spelling and spam folder, then send a new verification email if needed.
Privacy And Stored Data
Board Export+ may store Trello access tokens, export settings, schedules, template metadata, export job history, retained artifacts, and data included in generated exports. Treat exported files and public share links as sensitive if they include client, member, card, comment, or attachment information.